Thursday, February 28, 2013

Project 2016 -- Florida or Bust: Kitchen Makeover Day Six


As the week passes, I am more and more convinced that I really underestimated the amount of time that I would need to accomplish this. While I have done a lot of work, the painting is really slow. Not because I am a slow painter, but that each door needs two coats of the base paint which has to dry completely between coats. You can only paint one side at a time and I only have room for 2 doors at a time on my painting station.

[Tip Alert!] Following a suggestion by the folks at Rust-Oleum, I took a shelf out of an old wall unit and drilled holes in it. I then put screws through each hole. This allows me to set the doors on the screws holding the door up off the surface of the table. This allows me to paint the sides and allow them to dry without the paint "gluing" the doors to the table.

before painting bottom
after painting bottom
I have painted two coats of the base paint on both of the top units of cabinets. They look really good and I am happy with the way they look except for the color but that will change (see yesterday's post). However, I did have to make a discovery when I was sitting in the middle of the kitchen. I didn't think that I would have to paint the bottom of the cabinets, but alas, you can see the bottoms when you sit in a chair. It became really obvious when I painted the fronts and you could see the difference in color. So I had to take the extra time to paint them. But they will look really good when they are completely done.

All together I have 21 cabinet doors of varying sizes and 8 drawer front to paint. I have completed 2 coats on one side of the eight drawer fronts and 13 cabinet doors. And that is only the first step. When I am done with this, there is the glaze coat and then a protective gloss coat. Hmmm.

Happy painting.

Wednesday, February 27, 2013

Project 2016 -- Florida or Bust: Kitchen Makeover Day Five

What do nails, plastic wrap, and toothpicks have in common? Give up? They are all things that can make your painting easier.


As you can see, I have started painting the cabinets. When I first opened the can of paint, my first thought was, "Oh, this is way too light and way to grey." But I had to remind myself that it is a two step color process which includes a brown glaze which will warm up and darken the look. So for now I choose to not panic. But what I would like to talk about is some things that can make painting easier that were not necessarily made for painting.

Before you start sloshing paint around, one trick is to take a hammer and nail and punch at least 4 holes around the rim of the paint can. These holes will be under the lid when the lid is on. When you pour paint from the paint can, there is always paint that ends up in this crevice. The holes allow the paint to drain from this crevice and back into the paint can when you push the lid back on. Without these holes, you often end up with paint being squeezed out and over the edge making an even bigger mess than when you poured the paint.


Kitchen plastic wrap that you use to keep food from drying out in the refrigerator also keeps your brush and paint tray (paper plate) from drying out during a lunch break. In dry areas, latex based paint can start drying pretty quickly. A long lunch is enough to end up with a thickened layer on your paint and hard to clean paint brush. In the past, plastic wrap has even kept paint and paint brush wet enough for me overnight.


Sometimes when painting over small holes where hardware needs to be replaced, the hole gets covered with paint. Using a toothpick, you can easily
clear the hole of the paint. You can use other things too, like pencil tips, nails etc. But I have always found toothpicks to be plentiful and always available in a kitchen.


Happy painting!!

Tuesday, February 26, 2013

Squeezing Some Knitting in on my Working Vacation


This is one of the reasons that Fair Isle can be a pain. This is my latest design project. I have been working on this for a couple of weeks and you can see that for every color you add, you get two yarn ends that need to be woven in.

My favorite method of weaving in loose ends of thread is to "skim" them into the back of stitches. Skimming can be done vertical or horizontally. In skimming, you put the needle into the yarn instead of under or around it. The picture on the left shows a my needle splitting the strand of yarn. After splitting 4 or 5 stitches I pull the stitch through.

While I can try to explain what is done with pretty pictures and try and describe what it is I do--I think that I will let the master take care of it. TechKnitting had a three part series on how to work in ends. Part one is how to  skim; part two on weaving and part three on weaving for ribbing.

Enjoy! Happy working in ends.

Project 2016 -- Florida or Bust: Kitchen Makeover Day Four


One of the best things about taking a "working vacation" has been getting to spend some quality time with the DH (Darling Husband!) We spent a "relaxing day" washing and deglossing the cabinet doors and frames in preparation for the paint treatment. Mr. B was observing carefully to make sure that DH did not make any mistakes. When we get the rest of the doors done --we are on a break right now-- we will cut off for the day and begin the painting tomorrow.

I want you to notice the clean floors in these pictures. It is quite a difference from the other day. That's thanks to my handy dandy DH about 3 times through the kitchen with the vacuum. You got to love a man who will vacuum!

I got to get up and finish the last of the doors. I'm tired and all I want to do is knit.

Happy knitting! (Hopefully)

Monday, February 25, 2013

Project 2016 -- Florida or Bust: Kitchen Makeover Day Three


In our last episode, the DH and I applied the adhesive base coat and the color chips in the first step of the application process of the Countertop Transformations® kit. Following the directions, we left the counter tops alone to dry overnight. This morning, with barely a cup of coffee in me, I started getting the extra chips off of the counters and sanding. It didn't take long to see that the coverage in some areas was not thick enough and the original white was shinning through. The further I went, the more convinced I was that the lack of coverage was systemic and not just one isolated area. It would need a second coat. Problem is, we used most of the product yesterday.

This left me with a decision -- go back to Lowe's and purchase another kit for $248.00, or finish the last step and be unhappy forever. I didn't do either, I contacted Rust-Oleum's customer service. I explained my issue to the customer service representative and he said that I could special order additional adhesive base and color chips through Lowe's and it would be somewhat cheaper than ordering a new kit. It would also save me time than if I continued on with the top coat and decided to re-do it at a later date. Once I put on the gloss coat I would have to sand the gloss off the finish at this point, I just paint on a new coat of the base.

So off to Lowe's the DH and I went. Again, I explained the issue to the sales woman at the paint counter and gave her the customer service number for Rust-Oleum. After a conversation with Rust-Oleum, I was told the extra product would have to be purchased in a lot of 2 cans of base and 2 sets of color chips at $170.00. Twice as much as I really need (unless I screw up again and need a third coat) for less money. But it would take about a week (read 10 days or more?) for the order to come in. This means living with a kitchen I am unable to use even longer. But for an $80.00 savings, I guess I will put up with waiting a week. Waiting however does not save me from cleaning the mess up yet again.

I will say that where the counter tops are covered with enough product, they look great. So I think with the added effort and cost, I will be happy with the end result.

My makeover plans, as many do, have been interrupted and will have to be changed or my week vacation will be for naught. Plan B is to work on the upper cabinets on both sides of the kitchen and getting them done as they are out of the way of the counter tops. I can also do all of the lower cabinet doors and drawer fronts. Besides, if I run out of doors to paint, I can always knit!

Happy change of plans.

Sunday, February 24, 2013

Project 2016 -- Florida or Bust: Kitchen Makeover Day Two

Before
Before

Wow! My whole body hurts! Yesterday was a long day and I hardly got started on the counter tops. I emptied all of the cabinets, moved the kitchen table into the family room and got the microwave down. I took all the extra caulk out of crevices along the edges of the counters and around the sink. I set up a work station with my new saw horses and a wooden shelf in the middle of the kitchen. I'll use this as a table where I can prepare the doors for painting and use as a station to do the counter tops.

After
After watching the counter top restoration 'how to' video again, and for about the last half hour that I could remain standing, I started sanding the finish of the laminate counter tops. It only took a half an hour to get them half done. This afternoon after I finished sanding the counter tops and taping off the sink and other areas, the DH and I did step one of the counter top transformation.

After
Funny thing about 'how to' videos, the people on the 'how to' videos smile a lot, never yell at each other, and not only are they perfectly clean when finished -- the room is clean, too! Not so much at my house. A little yelling, a paint covered T-shirt, and a HUGE mess!

The process is to roll a thick adhesive paint onto the roughed up counter tops and then using this "yard-fertilizer-spreader" applicator thing you put this substance that looks like (is?) crushed rock. The crushed rock is now everywhere!

I am glad I followed the instructions to tape up the sink. I can imagine what would happen to the garbage disposal if I had not. The crushed rock even went over the ledge behind the sink and landed all over the sofa in the family room. (I guess I needed to vacuum anyway.)

Mess
Yes, in the carpet, too.


The color is such a stark contrast to the original white. But no remorse here, I know that the cabinets will be much lighter and with clean painted walls, this kitchen will look great.

Happy (?) cleaning!


Saturday, February 23, 2013

Project 2016 -- Florida or Bust: Kitchen Makeover Day One


It's all about going South! Since my dear husband (DH) and I have decided that we are going to fix up the house and move back to Florida. With as many things as has to be fixed up, it will take us three to 4 years to get everything done and we plan to put the house up for sale in 2016. Kitchen first!

I blogged previously on my kitchen makeover and told you some of my plans. Last night, the DH and I went shopping at one of my favorite stores, Lowes! We picked up both the 
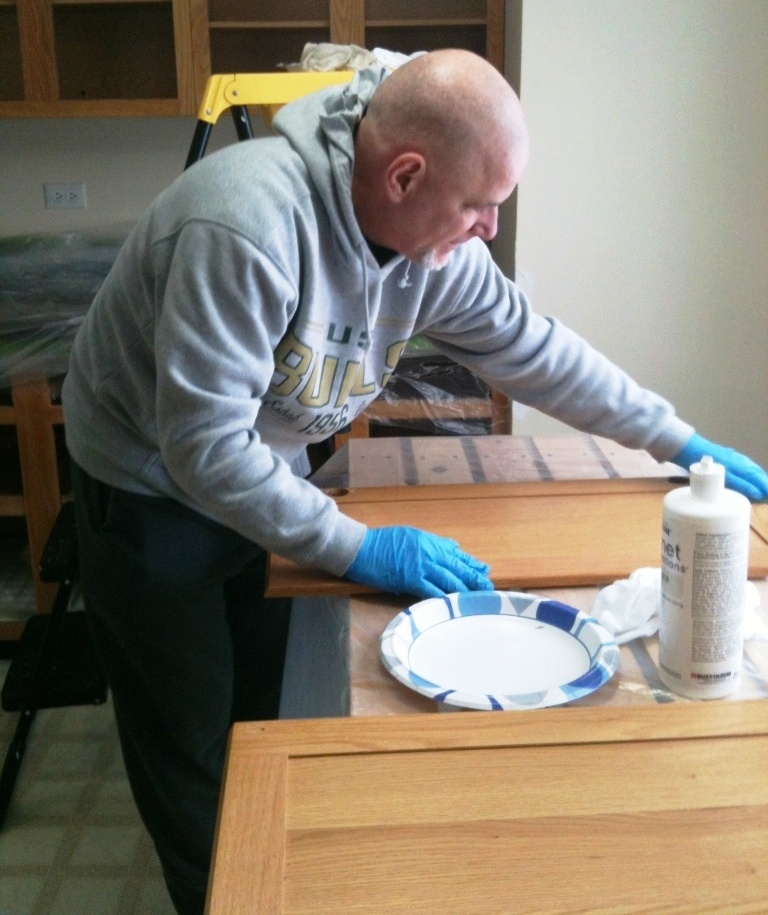
Cabinet Transformations® and Countertop Transformations® kits that we are using as well as paint brushes, rollers, drop clothes, roller pans and more. The gentleman who helped us suggested that we do the counter tops first and the cabinets second. I think that I will follow his advise. While I don't think that it matters which I do first, I do think that doing the counter tops first is better as I can work on painting the cabinet doors while the counter top cures. However, since the counter tops take a week to "cure", it will mean some difficulty in having to be very careful around the counter tops when working on the cabinets.

I underestimated the amount of work that needed to be done in advance! I have a lot of cabinets filled with a lot of stuff. So that has given me a good opportunity to purge. I have already made one trip to Goodwill and have a new pile started. But regardless of whether I am giving it to Goodwill or keeping it, it all has to come out of the cabinets!

In order to keep track of the cabinet doors, when I was removing them, I took paper and mapped out my cabinets. I then lettered and numbered each door on the paper and transferred that letter/number combination to 2 pieces of painter's tape. One I attached to the door and the other to a plastic sandwich bag which contained the hardware for that door. This was something that was recommended on the Rust-Oleum website.

I also have to remove the built-in microwave oven/range-hood combination. I could leave the microwave where it is and paint the cabinets around it, however, then if it ever has to be replaced, the replacement may not cover the unpainted portion of the cabinets. And since that may happen before we sell the house, I don't want to worry about it later. Better to take the time to remove it and paint properly. Thankfully, I have the original installation instructions. So by reading it backwards, the DH and I should be able to safely remove it and replace it later after painting. By the way, this should be something that everyone does when installing anything in the home or putting any item together that has more than 2 or 3 parts. Keep a file folder or drawer that contains the original installation and/or assembly instructions. You may end up throwing them away 3 years after you get rid of the item, but they may come in handy at just the right time!

The DH is facing at least a week of cold meals. Ouch.

Got to get back to work. Happy remodeling!

Friday, February 22, 2013

If You Are Going To Order One Book, Save Postage and Buy Two!

Since I had to "accidentally" purchase Alice Starmore's book, I decided to order a second one. This one is Mary Jane Mucklestone's book, 200 Fair Isle Motifs. The book is chock full of color plates sorted by the number of row and then by the number of stitches. I think that it would make it pretty easy to select an entire sweater worth of pattern.  In addition ,to the motif catalogue, the book contains a section on Essential Skills of Fair Isle Knitting. With information on yarn selection, proper equipment, swatching, color selection and steeking, this is a great resource for someone who wants to begin Fair Isle Knitting.

Happy knitting!

Thursday, February 21, 2013

A Quick Book Review

Some books are bought after a lot of thought; some books are bought after a quick "look-see". Some books are bought by accident. Or should I say this book was bought after an accident. Thankfully, I really liked the book!

There are a couple of colleagues at my office that are fiber artists. I told you about one who taught me how to spin my own yarn. She got Alice Starmore's Charts for Color Knitting as a gift from her husband for Christmas and was generous enough to loan it to me for a weekend to read. I intended to return it to her on the following Monday, but she was out of the office, so I carried it back and forth on my commute one more time. 

I drink a large thermos of coffee every morning on the way to work. I guess it doesn't take much effort to imagine what happened next -- after only a couple of sips of coffee, I threw the thermos in my commuting bag, but the lid was not closed properly, and my bag was drenched with coffee -- extra cream. The book was in another compartment, but there was enough coffee was in the thermos that the binding on the book turned brown. So I had to hop on Amazon and buy a new copy for my colleague and I kept the coffee copy for myself. At least I really like the book.

This is the new and expanded edition. In it, Starmore has a number of traditional and self designed motifs. The traditional patterns come from Norway, Sweden, Finland, Latvia, Russia and several other countries. The charts of the patterns in the book are clear and easy to read. The photos of her work are treats to the eyes.

I have already made good use of my "accidental" purchase. I have two of the motifs in my new design that I am creating. You can see the first motif (the triangles) just above the ribbing.

I'll use this book a lot -- it's a classic!

Happy reading about knitting!

Tuesday, February 19, 2013

Remodeling For Girls!

There must be several of you who are wanting to know how I am doing on my kitchen remodel. I am plodding along at the moment, waiting for my weeks vacation to get the majority of the work done. I have taken the doors off of the cabinet today and begun to patch the damage done to the wall that I showed you in a prior post. I have been working on it a little every night, er almost every night. (Sometimes knitting/spinning/plying gets in the way.)

I want to share with you a product that I have used several times in the past. DryDex is a spackling product which changes color as it dries. And get this: It Goes On PINK! PINK -- what's not to love about that. As it dries, it turns white. This lets you know that it is dry so that you don't sand it too early. Wet sanding spackle will cause a build up on your sand paper (or sanding block) which will make the sanding ineffective.

When the spackle is completely white, you can sand it or apply a second layer of spackle as necessary. Easy Peasy!

During the week, I will continue to remove doors, wash the last of the wall paper paste off the walls and patch the damage. I have to find places to put all my dishes. And purchase saw horses in order to make a work bench in order to paint all the doors. So much to do!

Happy remodeling!!!

Monday, February 18, 2013

Spring Colors Are A'coming


The days are getting a little longer; today's temperature was significantly above freezing; and baseball spring training has started. That means that the trees should begin budding and my tulips will start to show themselves any minute now.

My little lace project that I started a couple of weeks ago using my hand-dyed, hand spun and plied yarn is going well, I have had to stop and ply additional yarn once and may need to do that again before the end of the week. The yarn is knobby and varies in thickness to give the lace a rustic look, but the BFL wool is soft and the yarn will feel nice on my neck when wearing it. I'm looking forward to finishing this one.

Happy knitting!

Wednesday, February 13, 2013

The Design Process


I have been working on a new pattern in color-work. It has been giving me fits. The design process can be both a joy and a frustration and this one has been no difference! In order that you may share in my discomfort, (or maybe avoid it) below are some of the salient points so far:

I started out thinking that I would do the hat using worsted weight. I did all the necessary math to figure out how many stitches I needed for an adult head and developed my pattern with those numbers in mind. Then somewhere along the way, I changed my mind and wanted to knit the hat using a fingering weight yarn. I didn't recalculate the math until late in the design process and then had to scrap part of what I had wanted to do. Ooops!

As a result of the math change, I went from 126 stitches to 168 stitches around. This made me have to change one of the motifs in my design. Since I couldn't modify the motif, I ended up replacing it. When I replaced it, I used something that looked visually lighter. This forced me to reconsider one of the other motifs in my design and I "lightened" it up as well. That made the entire design better.

I incorporated the ribbing that I learned when doing a color work mitten back when I first started this blog. I have to admit, I never finished those mittens, but like everything else, I learned from them. Learning to knit continental has helped tremendously. It lets me knit one color with each hand and it also helps that my knitting has gotten so much more even.

I tried to place the colors into the pattern before I even got started knitting, but I think that it will work out better if I just pick those as I go.

I settled on Knit Picks Palette. With 150 colors to choose from, this is a great "palette" to choose from. I got 40 different colors by purchasing two different kits on sale and was able to get the yarn at near 50% off.

Sunday, February 10, 2013

It Wasn't Made to be a Yarn Bowl. . . BUT it is One Now!


My knitting sister went on a mission trip to Nicaragua and I watched her dog while she was out of the country. As a thank you gift she bought me a hand carved bowl by a local Nicaraguan artisan. The second I saw it, I realized what I would use it for! For those of you who are not knitters (or crocheters, etc.) A yarn bowl is used to hold your yarn ball so that when you pull on the yarn it doesn't fly off of your table and skitter across the floor. The artist may have put the slots in the bowl for artistic flare, but they are just what a knitter wants in a yarn bowl.

Saturday, February 9, 2013

Dyed, Spun, Plied and now Knitting.


It has been awhile since I posted on my hand-dyed, home spun yarn. I had shared some of my dyed roving with my friend who introduced me to spinning and she showed me what she had spun and plied and I was inspired! I immediately came home and started plying up what I had spun.

I should have taken pictures of the plying process, but I was so excited to begin, that I completely forgot! My knitting sister got here in time to remind me to take a picture before I pulled the blocked and weighted yarn off of the clothes line where it had spent the night drying.

I ended up with about 80 yards of plied yarn which was two small wound balls of "artisan" yarn which varies in weight from fingering to worsted.

I knew that I wanted to make a narrower, lace scarf that I could wear at work with a blouse. I toyed with the idea of a lace hat, but it would never be warm enough for me to wear in the winter and I wouldn't wear it in the spring. Besides, if you go to all the trouble of dying, spinning, plying and knitting up your own wool, then you should be wearing it all day! So, a scarf was the perfect wearable item.

I selected a free pattern from KnitPicks called Victorian Spring Scarf which seemed to be just the ticket. The pattern calls for a slightly thinner yarn with a larger needle, so I will need more than 80 yards, but I have plenty more wool roving to spin. I have gotten about two repeats of the lace done and am pleased with how it looks. Yum!

Happy knitting!

Wednesday, February 6, 2013

Blocking a Hat, Again.


And you thought I forgot about knitting. . .NOT!

I finished my Don't Sit Up, Slouch Hat and got it blocked. I used the same method that I did on the Matching Ginkgo Hat -- stuffing it with grocery bags and setting it on an old wine bottle. For the little tail, I got dark wood beads to use as a decoration. I think it will be really cute. As it is a gift for a friend, as soon as I can get pictures of her wearing it, I will post them.

FUN FUN hat to knit. The pattern was challenging enough that I didn't get bored, but it was easy enough, I could do it while watching TV or listening to a pod cast. I think I may knit one of these for me, too!

I do have some of my own designs in the pipeline. I have ordered some fingering weight yarn in order to knit some test samples. Can't wait to get started.

Should be fun!

Happy knitting!

Monday, February 4, 2013

Quick Changes

Things change quick in remodel-land. I said in my last post that I would wait to pick out the tile for the back splash until I had finished the counter tops and cabinets. But on a second trip to Lowe's, I found this recycled glass tile that is just perfect for the price and since they only had four boxes and I needed two, I snapped up the two that I needed before someone grabbed all of them. There are so many different browns in the tile that I think it will work with my plans.

But that wasn't the reason I went shopping. I was having problems getting some of the old wallpaper off the wall. I had done some research and read where, in most cases, vinegar and water in a 1:1 solution worked just as good as anything in removing wallpaper. You will notice that I wrote "in most cases". The plaid wall paper and the paper with the little olive branches came off just fine, but it seemed as if the border was put on using super glue. After using nearly an entire gallon of vinegar, I knew I needed to use something different.

I went to Lowe's and picked up a bottle of some type of wallpaper remover and found Piranha Gel. It works really well and did not stink up the kitchen. Even though it said it was non-toxic, I did wear gloves when using it. I had to strip off the top layer of the wallpaper (which was vinyl) so that the gel could get down to the paper and the adhesive. But this ended up much quicker than water and vinegar.

Sometimes, things you do to prevent one problem, causes another problem later down the road. On the left, you will see a photo of one of several plastic corner guard that were on the corner of the walls. They were attached with both adhesive and nails; and when they were pulled off the wall - they took parts of the wall with it.

On the right, you can see the damage done to the wall. I have several corners now that have this damage and will require patching. I really don't need the extra work. . .

Happy patching!

Sunday, February 3, 2013

Where There is a Will -- There's a Way!

I spent an afternoon at Lowe's. I looked at paint, flooring and counter tops as well as lighting. I went to the area where they have all of the cabinets and counter tops and asked some questions of the sales clerk-- er, designer. I told her I was on a budget and she began showing me some "less expensive" options. I gave her the linear dimensions of the counter top and she gave me an approximate price. Hmmm -- her price was higher than my entire budget. She must have seen my budget written all over my face, because suddenly, she was not so eager to help me find anything. I guessed I was not going to get new counter tops.

But heading through the paint department, I saw another option: Countertop Transformations™ by Rust-Oleum. I looked at the display and read the information on the box. Hmmm, maybe I could get new counter tops and new cabinets using Cabinet Transformations®, too!

Upon returning home, I got on to the internet and and went to the website to research the products. Rust-Oleum's website has product how-to videos and a "virtual kitchen" tool which allows you to mix and match cabinet and counter top color combinations until you find the one that is right for you. I found the combination that I liked and then made 5 different combinations and showed them all to my husband. Surprise, Surprise -- he picked the "right" combination!

I think that we will do the cabinets and counter tops before picking out all of the other colors for floors and back splash tile. Now I am getting excited!!!

Happy "Picking-out-all-your-colors"1


Saturday, February 2, 2013

It's Not All About Knitting


I know that most of you think this is a knitting blog. It has only been a knitting blog because of late, knitting is all I have been blogging about. But if you read the title and sub-title of the blog at the top of the page, it is "Natterings Smatterings, Incessant chatter with insufficient knowledge on quilting, knitting, sewing, cooking and the like." Well, we are about to get started on "the like"!


I remember during the early 1990's going to home developments seeing models decorated like this and wishing my kitchen was as pretty.

You may recognize the large floral wallpaper boarders and golden oak cabinets as being classic 1990.


With the ever present coordinating plaid wallpaper...


carefully mingled with fruit or floral wallpaper. I think that this is supposed to be olive branches.


and the de rigueur vinyl flooring. Say 'good-bye' ugly kitchen flooring.


We don't have a large budget, but paint doesn't cost too much. The only large purchases will be the flooring and counter tops (maybe). I am going to research if it is better to just clean the cabinets and leave them as is or if painting will be OK.

This is the beginning of Project 2016 -- Florida or Bust. It ins't going to be easy getting an early 1990's house updated for a quick sale in the year 2016 on a really tight budget. But we have about 3 years, and if we don't go too trendy with colors and leave things like carpet until the last minute, we should be OK.

I will still be knitting. I can't work on the kitchen when I am on the train, but you will get a lot more like this over the next few weeks.

Happy "pulling-wallpaper-off-the-walls"!