Saturday, December 22, 2012

Sea Anemone Ear Flap Hat

Just the ear flaps done
After making Charlie's Chullo, I had tons of yarn left over. I bought three skeins of it, knowing that I was going to be cutting out all of the green and I only used 100 grams (equivalent of one skein). I thought of doing another Chullo for myself, but I decided I wanted to look for something different -- and something different I found!!!

I was reading some of the knitting blogs I follow and found this post by Carla Price on her blog Knitting is a Romantic Drama. BINGO! This was something different. I contacted Carla and she generously added her notes on how she created her self-designed hat. She pointed me to where she learned the stitch: a video by one of my favorite sock designers, Cat Bordhi (how did I miss that?!) And away I go. . .

I am still addicted to ear flaps, so I started directly  with the them -- no i-cord on this hat. Since the tendril is created on the knit row; I am doing my increases on the purl row. Although, both Carla and Cat made their tendrils with a set count of twists, I am being a little less rigid and twisting until it looks right as I am making them somewhat different lengths. (Anemones don't measure their little tentacles to make sure they are all exactly the same.)

I am thinking of adding a strap between the ear flaps to keep the hat tight in the Chicago winter wind. I don't want to loose this puppy! That is one nice thing that I found about the i-cord on the other hats (here and here) I made myself. If I tuck them into my coat, it helps the hat stay on in 50+ mph wind gusts. I walk across the Chicago River and the wind is always strongest there. I don't want any of my work to take a dive -- I won't go in after it.

This is a really fun project. I am taking detailed notes, so that if the hat works out, I will have a pattern to share. Who knows, maybe I will even go back and make a child size hat, too!

Happy Knitting!


How to make an tendril: 

Fig. 1
With right needle, pull yarn from back to front between 1st and 2nd stitch on left needle (Fig. 1), until you have a folded over piece of yarn about 3 to 4 inches long from fold back to knitting (Fig. 2).
Fig. 2


Fig. 3
Place your finger in the fold and twirl the yarn a few times as if you are plying it (Fig. 3).

Fig. 4
Fold it back on itself and place the loop from your finger to the left knitting needle (Fig. 4).


Fig. 5
Knit it along with the 1st stitch on the left needle (Fig. 5). One tendril made.

Fig. 6

Fig. 7
Be careful when knitting the tendril, that you keep the tendril under the needle as in Fig. 5. If you knit with the needle underneath the tendril (Fig.6), the tendril will end up on the wrong side of the fabric or the inside of the hat (Fig. 7).

Making the tendril the "wrong way" as in Fig. 6 is a little easier as the stitch is not stretched as tightly and I made several wrong and had to correct them.


Saturday, December 15, 2012

Obsessive Compulsive Chullo Knitting


Introducing: Charlie's Chullo -- that would be Chullo number four. Alright, I know I have a problem. I just love making these things.

I used Noro Hitsuji again -- this time in a brown, black, orange and green colorway. However, Charlie wanted the colors to be more like the San Francisco Giant's uniform colors, so I removed the green and limited the grey. It is amazing how different two skeins of the same Noro yarn can look! Don't worry, there will not be any waste -- with the left over yarn, I will make myself a hat with more green in it!

When I completed the body of the hat, I attached the decorative spirals which Charlie said he would prefer over "fru-fru" pom-poms.I made four spirals, each in a different color cut out of a different part of the yarn. And each spiral is made a slightly different length.

Also known as "curlicues", spirals are really easy to do:

Leaving a long tail, start by crocheting a chain of any length --my shortest one is 14 chains. Make 3 Single Crochet stitches in each chain beginning with the 2nd chain from the hook. You will begin to see the spirals curl in just a couple of chains. When you reach the end of the chain, clip the yarn -- again leaving a long tail. Draw both long tails through the top of the last loop left on the hook.

Attaching them to the hat is just as easy:
Using a yarn needle, pull each one of the long tails on one of the spirals from the outside to the inside of the hat. Put one on each side of the circle left at the bind off of the hat's crest.


Continue to do this until all spiral tails are pulled through to the inside.


Next tie the pairs together in a knot.


Trim ends of yarn. You don't want to trim them really short, where the knot can work loose. If you use a square knot as opposed to a granny knot it will be less likely to slip.


How good looking is that!

Happy Knitting!

Tuesday, December 11, 2012

As a Knitter, You Can Fly, But You Can't Deliberate.


I found out something yesterday. You can still fly with knitting needles, but don't try to enter a court room with knitting needles. Hmmmm, I should have known considering last year I blogged about this. I was so excited about the possibility of a day of uninterrupted knitting. I had my knitting bag packed with all of my projects and the first thing I see was a sign listing all the prohibited items; guns, knives, knitting needles, etc. Back out to the car with all of my fun.

At least I was selected as an alternate juror and was too busy to knit. I did get a little reading done in my new used book during breaks. It is back to work tomorrow and back to the regular knitting schedule.

Happy Knitting!

Sunday, December 9, 2012

Preparing for Jury Duty


I remember the last time I was called for jury duty. It was several years ago when I still lived in Florida. I got a lot of knitting done on what turned out to be the ugliest sweaters I ever made. But several hours with nothing to do but knit sound wonderful! So, I am planning to take a three different projects with me. That way if I get tired of knitting on one project I can switch to something else.

 Project one is my Haruni, Grandmother's Wrap. As long as the lighting is good where potential jurors wait, I should get some lace work done. I worked on it for awhile on the train on Friday, but I will have to tink back to get rid of two extra yarn overs that I put in the wrong place. I would try to just slip them off, but they are 2 stitches apart and I know that they will leave the knitting in that area a little too loose. I know lace is supposed to have hole in it, but not big enough to drive a truck through! The blue headed pin marks where the extra yarn overs are.

Project two is Jacklyn's Ginkgo which I started just a couple of nights ago. I am still in the early part of the pattern which is basically just stocking stitch. This will be a great project to work on when my eyes tire or my patience wears thin on the intricate lace of the Haruni.

Project three is yet another Southern Lights Chullo this time for my husband. Charlie's Chullo is in a brown, black and orange color combination of Noro Hitsuji. The colorway also has a lime green in it, but I am cutting that out so that it will be closer to the Black and Orange of his favorite baseball team, the San Francisco Giants. Don't worry, the lime green won't go to waste -- I will have enough yarn left over to make me another hat with lots of green in it! My plans are to make similar modifications to the pattern as I did to my daughters: more coverage on the back of the neck as well as a swap of crochet spirals (on right) instead of pom poms.

A little light reading may be in order -- especially since Saturday saw the arrival of my latest used book: In Sheep's Clothing, A handspinner's Guide to Wool by Nola Fournier and Jane Fournier. This book looks at a hundred breeds of sheep and the characteristics of their wool. I am looking forward to digging into this classic.

I would like to take my spindle and some roving with me too. That will get me through a few more grams, but I am not sure what kind of room in us captive jurors will be kept. I guess I could take some with me anyway, maybe I will meet a fellow spinner and make a new friend!

Happy deliberating!

Friday, December 7, 2012

Another Ginkgo -- Custom Ordered


As you may remember, my beautiful daughter came home for Thanksgiving and while she was here we made a trip to my LYS. She picked out yarn for the Chullo that I made for her as well as some yarn for a shawlette. She had seen my Fall Colored Ginkgo that I did knit last year and wanted me to do one for her.

The yarn that she chose is a beautiful, variegated sock weight yarn by Plymouth Yarns: Sakkie. This yarn is a soft, slightly fuzzy and tightly twisted two ply yarn made of 40% Merino, 40% Mohair and 20% Nylon. This yarn is machine washable. The color that Jacklyn selected is the Fiji colorway; it is mostly a medium grey with splashes of magenta, lime and tangerine.

I started knitting yesterday evening and I already like the yarn. Lots of definition in the stitches and the fabric is knitting up very evenly on size US 6 needles. Maggie Magali's design starts out with a very simple stocking stitch triangle. So, for the moment, I am just blasting through the knitting.

Looks like I have lots of knitting left to do, so Happy Knitting!

Wednesday, December 5, 2012

The 3 R's: Re-Purpose, Re-Use, Re-Cycle


In this economy, one has to think about saving money. I have been doing a lot of trying to do more with less and utilizing the 3 R's: Re-Use, Re-Purpose, and Re-Cycle. If I don't knit or sew something for myself, most of my clothes shopping is done at re-sale shops and Goodwill. It is now the cold months of the year and I have been thinking about some of the ways I could use second hand sweaters as opposed to just wearing them. I found a great blog post at Kayla K's Thrifty Ways.

Kayla K's article on re-purposing sweaters was written about 2 years ago, but is still very relevant with gas sky high and unemployment still an issue. Enjoy! and Happy Knitting!

Monday, December 3, 2012

Berry Pretty Star Hat

I finished the hat using my over-dyed yarn.  This is the Norwegian Star Earflap Hat by Tiennie Knits. It is a really cute design. I like it, but not a lot; and that is not the fault of the design, I like the over-dyed yarn, but this was not the right project for it. The difference between the star and the background is not crisp enough.

I made some modifications to the pattern. I started with a 4 stitch i-cord and worked up into the ear flap same as the three previous Chullos (here, here and here). The pattern is bigger than I expected. I started out with a size 8 circular needle, ripped the hat back to the earflaps, restarted with a size 7 circular and ended up changing to a 6 right after doing the purl rows. I do however, like the length of the hat. It comes down the back of my neck better than the other Chullo. It is loose enough that it does not mat down my hair when wearing it for a long time. I also put a pom pom on the top of the hat. Even though I liked the way the decreases formed a star -- the hat called for a pom pom.

I think I may end up doing another one of these in a crisper color way. I suppose a self striping yarn with a long, slow color change for the star would work better if I did not want to use a solid. I just need to make sure that all the colors pop off the back ground.

Happy knitting!

Monday, November 26, 2012

Grandmother's Wrap Update

After a long Thanksgiving vacation, I went back to work today and back to my commuting project, Haruni by Emily Ross. On the way home this evening, I completed row 28 of Grandmother's Wrap which is 3/4 of the way through the 1st repeat of Chart A. It is looking good and you can see the leaf detail clearly, but there is a long, knitting way to go. I am so glad I got the Addi Turbo Lace needles -- they have really made a difference.

Sunday, November 25, 2012

Two Quilt Tops Completed


I finished two quilt tops and sent them off with my knitting sister to my other sister who has a long arm quilting machine. I love to design the quilt tops, but I am not so fond of the actual quilting. It is not really easy on a regular machine and since one of my sisters has her own long arm, I avail myself of her talents a lot. The picture above is the finished boy design shown in my last post.

The other two pictures are blocks from the girl designs in process. We made six total girl quilt tops in different combinations of hearts and butterflies. It was two more girl quilts than I needed to finish, but babies seem to come quick and I can always use extras!

Happy quilting!

Saturday, November 24, 2012

Quilting in a Post Thanksgiving Carbohydrate Coma


 Teaming up with my knitting sister and my beautiful daughter, we decided to knock out as many baby quilts as possible for some newly arrived residents of this world (and a couple that have yet to make their appearances). We are trying to make the quilts bright and colorful, while keeping the complexity low. Hence all of them will have 4 big blocks and a pieced crazy piano key boarder. Using my favorite method of fusing and coloring page designs,we came up with a couple of "girl baby designs" and a couple of "boy baby designs".

My knitting sister came up with the crazy piano key boarder idea. I had suggested a piano key boarder (see the one I did on another quilt, here); however, she hates cutting fabric, so since wonky cutting is easier -- little measuring -- and faster -- again, little measuring, she suggested crazy piano keys. Knitting sister quickly started cutting out fabrics in color palettes, some for boy quilts and some for girl quilts.
Reds, browns and blues in one boy palette for for a sports themed quilt and pinks, oranges and yellows for a butterfly and hearts themed girl quilt. I have finished applying machine blanket stitching on one 4 X 4 block center of a heart themed quilt and have completed parts of two other baby quilts. But I have seven baby quilts to make in all.

With so much left to do, why am I still blogging?

Happy Quilting!


Tuesday, November 20, 2012

I Couldn't Stop at One


Starry, Starry Night Chullo
I have to say that I love this pattern. Not only is the Southern Lights pattern one of the cutest hats I have ever seen; it is one of the easiest that I have ever knit. Add to that the wonderful colors of Noro Hitsuji and it is hard to knit just one.

My beautiful daughter, Jacklyn, who is home for a visit from college, took one look at my South Bound Chullo II and requested that I make her one, too! She picked the yarn on a quick trip to my LYS, Wool and Co. Of course, I told her to pick one of the available colors in Noro's Hitsuji variety. So here is my third version of this hat -- Starry, Starry Night Chullo.

Urban Hunter
I did a couple of modifications to the pattern at Jacklyn's request. She wanted it to come lower on the back of her neck. I could have knitted something more like the Urban Hunter -- also a cool looking hat -- but I did not what to loose the ear-flap look and she loved the "braids", so I knitted the ear flaps only to the point where each had 20 stitches. I then connected them with the pattern directed 8 backward loop cast on stitches and knitted for about an inch back and forth before finally connecting the front of the ear flaps and knitting in the round.

As for the braids she wanted them longer so I knitted the i-cord a total of 20 inches before starting the ear flaps. For what ever reason, she did not want the pom pom on the top of the hat either. But that really was good, as I had only a few inches of yarn left.

Fun with Chullos?
LESSON LEARNED: When completed, her hat does not come down quite as long as she would have liked. I think that when I make the next one, I will want to buy two skeins of yarn. My gauge was good on the stitches, but somewhat shorter on the rows, I didn't worry too much as I knitted up the required number of inches before starting the decreases. HOWEVER, the error in my calculations did not consider that my smaller gauge would make a smaller "circle" in the crown, thereby bringing the sides up higher to the tune of about an inch. What I should have done was to knit an extra inch or so to make up for that loss in the center. Like I said -- lesson learned.

South Bound Chullo II
By the way, South Bound Chullo was lost only two weeks after I finished it and I recreated it with South Bound Chullo II. All in all, this is a pattern I will do again and again -- especially if I keep loosing them!

Happy knitting!


What happens when dye meets wool?


Take one skein of 100% wool, add 4 packages of Kool-Aid, heat and water!

I decided to use up some left over Kool-Aid from my dyeing experiment of two weeks ago. I had two skeins of Paton's Classic Wool in a heathered light grey and decided that I would try to dye one of them with Kool-Aid in the microwave. I wish that I had taken pictures during my process, but alas, I wasn't thinking.

I made a hank of yarn out of one skein of yarn using my Niddy Noddy that I made and tied the skein using figure eight ties.

I took two envelopes of grape and two envelopes of fruit punch and mixed each color with about 3/4 cup of hot water. After soaking the yarn in warm water as per my usual method (described here), I laid it out in a glass baking dish poured the dye mix over the yarn and used the microwave to heat it.

It was kind of a wing and a prayer experiment. I can't remember how long I let the microwave run, but I let the yarn cool, rinsed and voilà! Color!

I am thinking about knitting a hat in color-work with both the dyed yarn and the original light grey yarn.

Happy Dyeing!!

Saturday, November 17, 2012

Spinning Progress -- How Long Does It Take to Spin a Pound of Wool?


Baa, baa, black sheep,
Have you any wool?
Yes, sir, yes, sir,
Three bags full;
One for the master,
And one for the dame,
And one for the little boy
Who lives down the lane.


I'm guessing those bags only weighed about a 1/3 of a pound! Now, I know that I am new to spinning and that it takes longer to spin with a spindle as opposed to a spinning wheel, but that laundry basket full of wool really has not been reduced much. The spinning that I have done only amounts to 142 grams of yarn. Since there are 453.592 grams in a pound, there are approximately 311 grams left (less the 80 grams or so that I have given to friends for their knitting and felting projects).

Happy Spinning!

Saturday, November 10, 2012

Knitting with Lace Weight Yarn and Having the Right Needles

I began knitting another lace shawl. This is the lovely Haruni by Emily Ross. This is one of the first lace patterns that I fell in love with, but have put it off as I thought it was too hard. I even posted about the yarn I bought to do this project over 6 months ago. However, things change and I am doing this project with a completely different yarn than planned. I decided to use the Cascade Alpaca Lace in Garnet that I bought on a lark a couple of months later.

This yarn is 100% baby alpaca and is the finest yarn that I have ever tried to knit. This was the crux of my problem. Through knitting about 32 rows, I was repeatedly tinking back to redo stitches that I picked up under the row beneath that which I was knitting. This error basically un-knits the stitch and creates a slip stitch of the row beneath and a long loose yarn over in the same place. Of course, if not caught, the pattern is  ruined. I was also struggling with trying to SSK (slip slip knit) -- my Addi Turbos just did not have enough of a point.

I had "graduated" myself to Addi Turbos over a year ago when I got a great recommendation from my knitting sister who convinced me to try them. I have been a rabid convert ever since. Today, I am trying the Addi Turbo Lace. So far this has turned out to be a good decision. I have knitted only a couple of additional rows and it has made a huge difference. SSK's are much easier and I am not slipping under the stitch.

In the picture on the left, I think you can see that the points on the Addi Turbo Lace (the gold needle) has a longer and sharper point than the regular Addi Turbos have. In addition, the Addi Turbo Lace needles seem to be slightly less slick than the regular Turbos. This might be a benefit as the only drawback to the Addi Turbos have been that they are almost too slick for lace. It is true that the right tool for the job makes all the difference.

As long as I am talking about the baby alpaca yarn being the finest that I have ever knit, I thought I would give you a visual on different yarn weights.  Here is a graduation of different yarn weight of yarn that I have in my stash. On the left is the lace weight yarn in question, Cascade Alpaca Lace. It is followed by a fingering weight yarn, sock weight, sport weight, DK (double knit) weight, worsted weight and bulky weight. Of course all of these yarns are different manufacturers and fibers, but I think that you can see the differences between most. Prior to the Cascade Alpaca Lace, the finest lace I had used was the fingering weight yarn which I used for my Alexandra Gold.

Well, I have some knitting to get through, so I will sign off. Happy Knitting!

Tuesday, November 6, 2012

Spinning: Lessons Learned ... So Far


Practice does make a difference. After several days of spinning yarn, I have been able to get my yarn  much more consistent in thickness. In the picture above, the roll on the left was made before the roll on the right. I can see that there is some variance in both rolls, but less so in the second roll which is on the right.  I am still over-twisting my yarn, but it is not as bad as it was. I have been practicing so much, my right shoulder is hurting from holding my hand high when drafting.

Doing something new is frustrating and fun at the same time. You would think that I was watching a football game on TV with all the "OH NO!'s", "Gggrrr's" and "Come ON!'s" coming out of my mouth. Just when I think that I have drafting down pat, I pull so hard that I rip off a piece of roving. But I love watching the yarn form as I spin away.

There are lots of things you can buy to make your life easier. I now know that I need a Niddy Noddy, a Lazy Kate, Bobbins and a Swift. And there are some things that you can make pretty cheap -- if you don't care about pretty. I can't afford it all, so some leftover PVC pipe and glue made a quick homemade Niddy Noddy -- that saved me from one purchase. I will put the money saved in a jar and name it "Spinning Wheel Fund." And now you know what tool I really want!

Happy Knitting!

P.S - If you are interested in making your own Niddy Noddy, you can avoid all the re-cuts and adjustments that I made by watching this video by Camaj Handspun. I did glue all the parts except for one arm which I can pull out to release the yarn. I made my arms longer and stretching the tied and wrapped yarn over the arm would be difficult.

Sunday, November 4, 2012

All the Pretty Colors!

Here are the results of the Kool-Aid dying day. The colors in the sunlight are wonderful. Yum!

Saturday, November 3, 2012

Fun with Kool-Aid


In my last post, I told you how I bought an entire pound of Bluefaced Leicester ("BFL") roving and that I planned to dye 12 different colors with Kool-Aid. I started with my first two colors last night and then dreamed all night about dying wool and spinning. I was awake early and had my next two colors in the pot by 8 AM this morning. The beauty of using Kool-aid to dye wool is that it is readily available at just about every grocery store in the country.
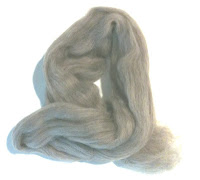
The un-dyed wool
I have read several on-line articles and watched some Youtube videos on dying yarn and basically decided to go with the most commonly used process that I saw: Kettle dying. In order to kettle dye, you need a kettle which is basically a cooking pot. Since I am using Kool-Aid which is a food product, I don't have to buy a pot to use specifically for dying; however, if I decide to begin dying on a regular basis and use other types of dye, I will have to buy a separate pot.

The next item that you must have for kettle dying is acid. The acid helps the dye adhere to the protein in the wool. This dye can also be a food grade product like vinegar or citric acid. Again, Kool-aid is great for a first time dyer as it already contains plenty of citric acid so it is not necessary to add more.

Since you will be working with bright colored dyes -- even food grade ones. You may want to use gloves and wear old clothing as blue fingernails take a while to fade. I didn't use gloves but the old clothes came in handy.

Step one in preparation is to soak the roving for at least half an hour to saturate the wool. Just like when you block a finished knitted item, it takes awhile for the water to penetrate the fibers because of the natural lanolin in the wool. Since I was going to dye two colors at a time, I set it up so that I had one bunch of fiber covered in hot water in a bowl weighted down with another bowl with wool and hot water which itself was weighted down with another bowl with just water. The bowls on top kept the wool entirely under water.

While the wool was soaking, I put two pots on the stove with water and set them to boil. When the 30 minute soak is done, I carefully remove the wool and gently squeezed it dry. Wringing the wool could have damaged the fiber. I added 4 packets of Kool-Aid to each pot, using a Kool-Aid color chart that I found on line.

According to all my sources, the amount of water does not matter at all, it is the ratio of wool fibers to the Kool-aid that matters. I had separated out all of the wool into 35 to 45 gram amounts so all the colors should be even in depth, but I had no idea how bright the colors might be.

I turned off the heat on the stove, boiling could have caused the yarn to felt and that is not what I wanted! Then I added a batch of fiber to each pot. The wool sucks up the color really fast, but leaves the water behind so that after only a few minutes the water goes from colored to near clear. According to the pros, this means the dye is "spent" and the fiber can be removed from the pot. Pour the fabric into a colander and drain out the water. You will want to leave the wool to cool a little and then rinse with hot water. Don't put cold water on really hot wool or you could felt it.

I rolled the fiber into a towel to squeeze the remaining water out and hung the freshly dyed wool in my laundry room. After a long day of dying, my house smells of an odd combination of wet sheep and fruit, but I have lots of lovely colors. I was able to get three gold/wheat colors, 2 purples, 3 greens, 3 reds and a pale blue.The BFL wool started out a grey color with lots of white and black hairs in it. So the colors have lots of depth. When it is all dry, I will try to take a picture outdoors to get better pictures, but on a cold, cloudy day, the laundry room picture will have to do. Can't wait to spin it and knit it.

Happy knitting/spinning/dying.